
Editor’s note: The following article is reprinted with permission from the Northwest RVing Blog hosted by MHRV (Manufactured Housing and Recreational Vehicle) Show Association.
Written by Steve Froese
RV leveling has come a long way since the days of driving up on wooden ramps. Come to think of it, many RVers still drive up on wooden ramps. However, some of us are lucky and have technology working for us in this regard. It’s great to be able to pull into a campsite, push out the slides, and activate the hydraulic leveling jacks, but in this article, I will discuss what to do regardless of how you level your rig.
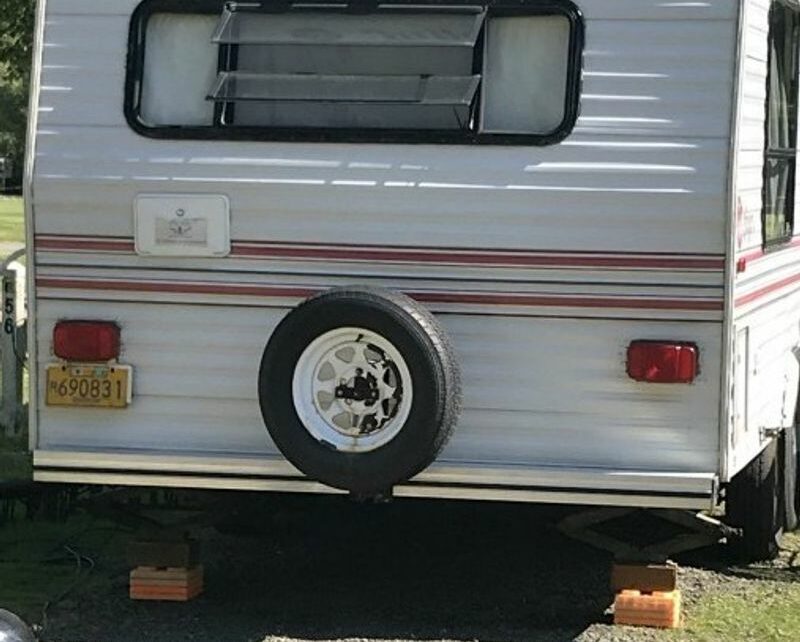
Whether you are camping in a trailer or motorhome, it is important to level or stabilize the coach once you pull into a campsite. The first step in this process is to ensure the campsite itself is relatively level. Surveying the campsite as you pull alongside it is a great way to perform an initial inspection of the overall quality and safety of the site. If you don’t like what you see, request another site, or proceed to another campground or park. Many paved sites are good quality and fairly level, although don’t make this assumption. We have stayed at a park in Oregon with well groomed, paved sites. Unfortunately, some are not level, and the step of our coach sometimes ends up about a foot off the ground when we stay there. Now we stay somewhere else. So, a preliminary site survey is always warranted. This should include getting out of your coach and doing a walk-around. This will also help you identify hazards and hookup location.
Once you have decided the site is satisfactory, position your coach on the most level location on the site. Hydraulic systems provide leveling information automatically, while it’s common for those without those systems to use bubble levels. There are good smartphone apps that also give accurate results. It is recommended that you place the level in the freezer compartment of the refrigerator, as this is the surface of the RV that should be built the most level – in theory.
If your coach has hydraulic leveling, be very aware of the ground type of the campsite. Concrete slabs can easily support the force exerted by the jack feet, but blacktop may not, especially in hot weather. Gravel and hard-packed dirt are generally ok, and grass may be, but soft dirt/mud is not. In these cases, the jacks will simply create craters in the ground rather than lifting your RV, and the jacks may get stuck. You should never extend your jacks in ice or snow. Also be aware of the park rules, as they may not permit hydraulic jacks. Always carry several jack pads at least twice the surface area of the jack feet so you can distribute the weight, and therefore the exerted force. If you are uncertain about the ground quality, forgo extending your jacks, or test the ground by partially extending them.
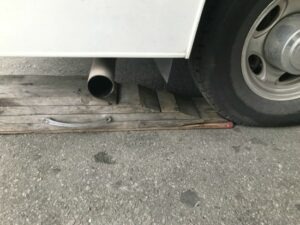
If you have a more traditional method of leveling your coach, such as driving up on ramps, make sure you always use a spotter so you don’t accidently drive off the end of the ramps or blocks. Drive very slowly up the ramps and hold the brake pedal when you are level. Pay attention to your spotter, who should be watching for you to reach the end of the ramp. Place the vehicle in park and set the parking brake. Use chocks to block the wheels not on the ramp. When building ramps out of blocks and planks, be extremely careful not to let the parts separate or “kick out” while you drive onto the ramps. If your vehicle has rear duallies, make sure your ramps or blocks are wide enough to support both tires. It is dangerous to only support one tire, and it is not good for the tires. With travel trailers, obviously you can use the tongue jack to level front-to-back.
Never jack up the rear wheels on a motorhome, as this will jeopardize the integrity of the parking brake. Even with rear jacks extended, if the rear wheels come off the ground enough to defeat the parking brake, the RV could roll, even with the jacks extended. Therefore, orient your unit so the front of the RV is lower than the rear.
Finally, it’s important to differentiate between leveling and stabilizing jacks. If your RV has scissor-type jacks, they are likely for stabilizing only and not levelling, as these types of jacks cannot support the weight of the coach. Stabilizing jacks are generally scissor type and incorporate a leadscrew. Consult your owner’s manual if you are unsure of whether you have stabilizing or leveling jacks. Hydraulic jacks found on 5th wheels and motorhomes are always levelling jacks.

Regardless of the type of vehicle or jacks you are using, always carry plenty of wood blocks and planks. These can be used to extend the stroke of jacks, or for a variety of other purposes such as building ramps. Blocks of several sizes and shape are invaluable.
Hopefully I have provided some valuable information for leveling and stabilizing your home on wheels. After all, we don’t want those wheels (and suspension) causing unwanted movement when we are parked at a campsite!

Author: Steve Froese, [email protected]
Steve Froese is a Licensed Professional Engineer in British Columbia, as well as an Interprovincial Red Seal RV Technician, which is equivalent to a Master Certified RV Technician in the USA. Steve was a personal friend and colleague of the late Gary Bunzer (“the RV Doctor”), and works closely with FMCA as the monthly “Tech Talk” columnist, as well as being a member of the Technical Advisory and Education Committees. Steve and his family are lifelong and avid RVers, mostly in the Pacific Northwest.