Editor’s note: The following article is reprinted with permission from the Northwest RVing Blog hosted by MHRV (Manufactured Housing and Recreational Vehicle) Show Association.
By Steve Froese
The topic of RV winterization is extremely relevant this year as people who have new RVs or people who can’t travel due to COVID restrictions will be winterizing their units that didn’t before.
While we don’t usually see temperatures much below freezing in our area, at least for a sustained period, it is important to winterize our RV plumbing system, as even temperatures just below freezing can result in damage to plumbing and related systems.
This article will describe the basic recommended steps for an RV with standard plumbing that does not include a washer/dryer, dishwasher, on-demand water heater, water dispenser, ice maker, or other plumbed appliances. If your RV does include any of these, refer to your owner manuals for winterizing information. There are two basic methods of winterizing, these being air and anti-freeze. While both methods are effective, I will discuss the anti-freeze method.
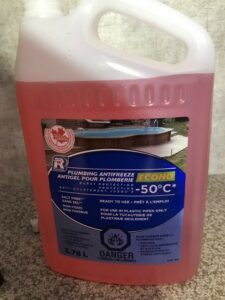
Plumbing Antifreeze
I will assume your RV includes water heater bypass valves as well as a water pump bypass hose, both used specifically for winterizing. If your coach lacks these, contact your servicing dealer for more information. Throughout this article, if you cannot find the items I refer to, consult your coach owner’s manual or contact your dealer.
The first step is to turn off the water pump and/or disconnect the fresh water supply. Open your fresh water tank drain valve or remove the plug.
Turn off your water heater, locate your water heater on the outside of the RV (does not apply to on-demand hot water systems), open the cover, and lift the lever on the P&T valve (the valve at the top of the water heater) until the water that comes out is no longer under pressure. Remove the drain plug.
Depending on the make of your water heater, you may have an anode rod connected to the drain plug. In this case, inspect the rod and replace it if it is more than 75% worn. If your water heater does not use an anode rod, replace the plug if the threads or heads are damaged. If your drain plug on non-anode models is NOT made of plastic, replace it with a plastic plug, as using a metal plug can result in galvanic corrosion, which often causes the metal plug to fuse to the water heater threads.
Do not replace an anode rod with a regular plug. Gain access to the rear of the water heater (often inside a cabinet, storage compartment, or behind a removable panel) and set the bypass valves to the bypass position. There will be one, two, or three valves to set. Your owner’s manual will describe how to set the valves, and there may be a diagram near the valves.
If you have a water filter, remove the filter element. Locate your water pump and the open-ended hose that should be near the pump. This hose may have a cap on it, and there will be a valve where the tube meets the coach plumbing. Turn the valve to the bypass position and remove the cap. Insert the tube fully into a jug of RV anti-freeze (not the anti-freeze used in car radiators).
Bypass Hose in Antifreeze
Turn on the water pump and open each hot and cold faucet one by one until pink anti-freeze comes out of the tap. If you run out of anti-freeze, connect another jug to the bypass tube at the pump. Don’t forget to open your exterior shower and any other outside faucets you may have.
Antifreeze at Faucet
Turn off the water pump and open any faucet until the pressure is released. Go outside, locate the fresh water inlet fitting. Remove the washer/strainer and GENTLY push on the white plunger inside the fitting until pink flows out.
Antifreeze at Outside Shower
Drain your gray and black water holding tanks. Pour about one cup of anti-freeze into each sink and shower drain, as well as anything else that has a P-trap. Don’t forget to winterize any other appliances in your coach, such as a dishwasher, washer/dryer, etc.
Your RV is now protected against freezing temperatures. As spring approaches, I will present another article on how to dewinterize your unit and prepare it for spring travel.

Author: Steve Froese, [email protected]
Steve Froese is a Licensed Professional Engineer in British Columbia, as well as an Interprovincial Red Seal RV Technician, which is equivalent to a Master Certified RV Technician in the USA. Steve was a personal friend and colleague of the late Gary Bunzer (“the RV Doctor”), and works closely with FMCA as the monthly “Tech Talk” columnist, as well as being a member of the Technical Advisory and Education Committees. Steve and his family are lifelong and avid RVers, mostly in the Pacific Northwest.